“How to use Express Scribe” is one of the most commonly searched terms if you’re new to the world of audio transcription.
And for good reason, NCH’s Express Scribe is possibly one of the best transcription playback software available on the planet. Individuals and online transcription services the world over rely on Express Scribe.
Can Express Scribe Transcribe Your Files Automatically?
Just to clear any confusion. It is NOT a transcription speech recognition software. While it can work with speech recognition software, it cannot transcribe files itself.
We’ve done an in-depth post on the best transcription speech recognition software for 2019.
Express Scribe is an audio/video player software that helps you transcribe your recordings or any media file. It can look daunting to someone absolutely new to the field of audio transcription. Which is why we’ve made this post to help guide you on how to use Express Scribe efficiently to save time and money for yourself.
Why is Express Scribe one of the Best Transcription Playback Software?
- It is quick to download and install
- It can play both audio and video files
- You can assign keyboard hotkeys for a variety of functions
- It’s very easy and quick to set up foot pedals for playback
- It supports a wide range of audio and video formats
- You can dock your analog or digital recorders to load recordings straight away
- You can connect it to your FTP to load files directly
- You can email transcripts from the software straight to clients
- It works with several different office software like MS Word
- It works with transcription speech recognition software
Understanding How to Use Express Scribe
The screenshot below explains the various options you see in the Express Scribe interface upon installation.
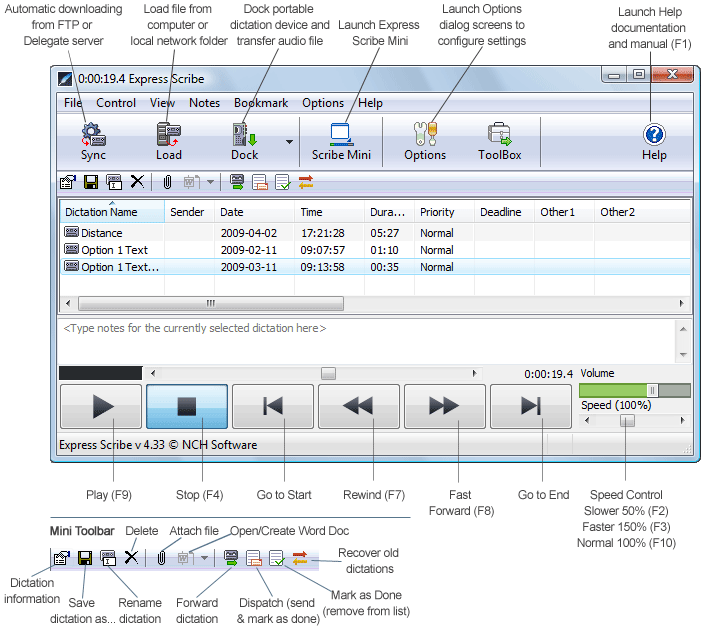
Please note that this screenshot is of a recent version of Express Scribe. To check how to use express scribe for the latest version, keep an eye on their website.
Express Scribe System Requirements
Express Scribe is Compatible with
- Windows 10, XP, Vista, 7, 8 and 8.1
- 64 bit Windows
- Apple Mac OS X 10.5 or above
- Any Discrete Sound Card or Integrated Sound
- All Major Transcription Foot Pedal Controllers
- SAPI Speech Engine
- Dragon Speech Recognition Software
How to Use Express Scribe to Transcribe Audio/Video Files
- Begin by downloading Express Scribe
- Install the software
- Once installed, understand the controls using the screenshot above.
- To set up global hot-keys, go to Options > System-Wide Hot-Keys
- Or set up a transcription foot pedal if you have one
- Drag and drop audio/video files into the player
- Or go to File > Load Dictation Files and browse to your file location
- Once loaded, use hot-keys or foot pedal to control playback
- Default hot-key to play the recording is F9 and to stop is F4
- By default F7 is assigned to rewind, and F8 to forward.
- Press and hold F7 to rewind and F8 to forward.
BONUS TIP: How to use Express Scribe for efficiency? In Options > Playback, set “Auto backstep on stop (ms):” to 2000 or 3000, so that every time you pause, it goes back 2-3 seconds, which makes your life so much more easier.
For a video, see below:
That’s the basic gist of it. However the software is more versatile than that and gives you tons of other options that we’ll further explore in this post.
Hot-Keys are Great for Proofreading, but not for Transcribing
Using hot-keys works great if you’re proofreading a transcript using a word processing software like Microsoft Word. Or if you want a free word processor, there’s the open source OpenOffice.
But if you want to transcribe, i.e. type in a document while listening, using hot-keys is definitely not the quickest or the most efficient way.
To transcribe a 1 hour audio file with hot-keys, it takes about 8-10 hours, depending on your typing speed and proficiency. You ideally want to spend most of your time typing during those 8-10 hours. Otherwise it adds more time.

Problem is you don’t catch everything at the first try, unless you’ve got superhuman typing and listening skills. So, there will be a lot of going back and forth.
How to use Express Scribe to Save Time?
If your fingers leave the typing area and use the hot-keys to play, pause, rewind and forward etc. that adds considerable time. Which is why professional transcribers or transcription services use a foot pedal to control playback. A foot pedal can shave 1-3 hours off your total transcription time easily. So, a 1 hour audio file takes only around 6-7 hours instead of 8-10 hours without a foot pedal.
If you’re not going to be doing this often, investing in a foot pedal makes no sense. At which point you’re better off giving your files to an audio transcription service like ours and have your peace of mind and time to spend on something more productive.
How to Use Express Scribe with a Foot Pedal
Transcription foot pedals are a great way to control playback with your feet, leaving your hands free to only type. For someone new to the field of audio transcription, this may not seem like a big deal. But trust us, it makes a huge difference to your overall speed, accuracy and efficiency.
Compared to using hot-keys to control playback, by using a foot pedal you can easily shave off 1-2 hours of the overall transcription time.
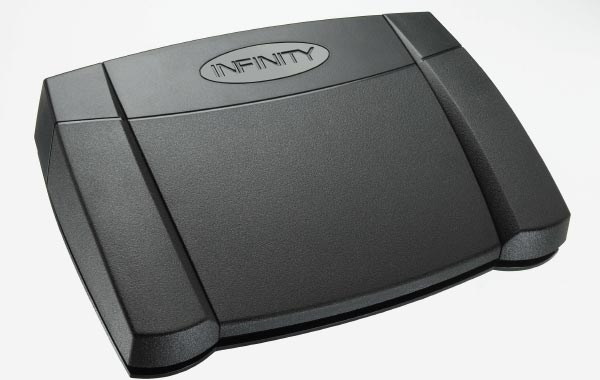
Transcription foot pedals are not widely sold around the world, so you won’t find them at your local gadget shops. Online is your best bet. One of the best selling foot pedals VEC’s Infinity (pictured below) is available on their website, along with Amazon USA and Amazon UK.
How to Use Express Scribe with a Foot Pedal? Steps Below:
- Once you’ve bought one from Amazon or their own website, connect it to your computer or laptop via USB (or the port of your choice).
- Open Express Scribe.
- Click on Options > Controller > Controller Setup Wizard.
- Make sure your foot pedal is connected to your computer before clicking Next.
- Your USB foot pedal should show up in the list of “Plug and Play” devices.
- If not, you’ll have to switch to the Legacy tab and select the appropriate option.
- Once you’ve selected the correct option, you should get to the “Controller Properties” page.
- You should see the company name, model, interface, buttons etc. depending on the product you bought.
- Once you click “Next”, you get to the Controller Command Map/Test page.
- Press the pedals/buttons on your foot pedal, and it should show up under the “Pressed” column.
- You can change a command by selecting one and clicking on “Change a Command.”
- Once done, click Finish and it should bring you back to the Options > Control dialog box.
- Check “Enable tap lock” under the Tap lock option.
The reason we choose “enable tap lock” is so that once you press the play pedal, it keeps playing until you press it again. This saves time and is hassle free.
How to Use Express Scribe to Add Time Stamps?
Time stamps are a great way for transcribers and quality analysts to mark inaudible/indiscernible words for client review. Or if you’re doing the transcription yourself, time stamps come handy to do a final transcript review to improve accuracy.
One quick way is to just look at the minimized Express Scribe window and type the time in. But that may not be the most accurate or efficient way, especially if you have to do it often.
Steps below explain how to use Express Scribe to copy and insert accurate time stamps using the hot-key function in your text:
- Open Express Scribe.
- Click on Options, and then System-Wide-Hot-Keys.
- Which should open the following dialog box:
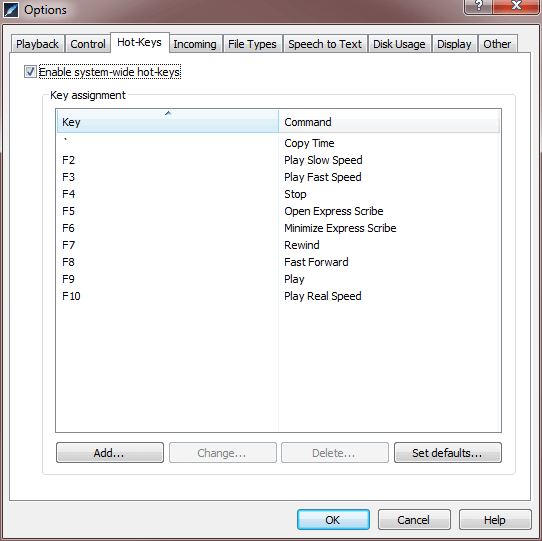
- Check the Enable system-wide hot-keys option at the top if not already checked. Now you can add, change and delete key commands.
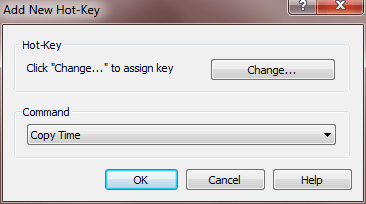
- Click on the Add button, it will open a dialog called Add New Hot-Key.
- From the drop-down list under Command, select Copy Time.
- Once you’ve done that, click on the Change button under Hot-Key.
- It will open a Press Key dialog and ask you to Press a key or a key combination.
- Press any key on the keyboard which you think would be easy and quick to reach (I use the ` button).
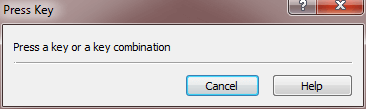
- Once you are done, click on OK, and same on the Options window as well.
- Next time you want to put a time stamp, hit the assigned hot-key and press Ctrl+V or right click and Paste it in your document.
Voila, we are done! If you can’t be bothered to time stamp your document, we can do it for you. And at no extra charge on top of transcription.
How to Use Express Scribe for a Finished Transcript?
While Express Scribe has the option to type your text in the software itself, we don’t recommend doing this.
That’s because there is no way to save that text. So, if you accidentally close the window, or your computer shuts down, or there’s a powercut, say bye-bye to all your hard work.
Which is why you’re better off using word processing software like Microsoft Word, OpenOffice, or even the Rich Text Format or Notepad that come standard with Windows or TextEdit with Mac.
We thank you for reading this article on how to use Express Scribe. We’ve included all the information you need to get started with audio transcription using Express Scribe. However, if you want to discover advanced features, please click any of the links below:
If it all seems daunting, or you think you don’t have the time or effort to do it yourself, our transcription team makes it all easy for you. Simply choose from any of the options below:


Awesome, thank you! I wish there was a way to automatically put brackets around it when we paste it into the document. I am doing a 70 audio minute transcription where they want it time stamped every 30 seconds and we put that in brackets ie. [00:00:00] I don’t know why they don’t just ask us to use numbered lines! This helps me though as I was one that was reading it off the bottom of Express Scribe. Thanks again!
You’re very welcome, Debbie! We’re glad it helped you. :)
Hi, I am having difficulty understanding exactly how to insert a timestamp, let’s say, every 10 seconds, because that is what my client has asked me to do and, in the past, I have had to do it the very long way and that is, of course, to listen to the audio all over again with my Word document up and inserting a timestamp every 10 seconds, MANUALLY. This video, and every other link I’ve clicked on has been very helpful in assisting me to allot the time code command to the F1 key, however, I still do hear or read anywhere how to automatically add a timestamp every 10 seconds. Now, maybe that is not completely possible with the Express Scribe software, since I just read a comment below stating that a different software does do that exact function, however, I do believe there is an easier and less time consuming way to add my timestamps every 10 seconds, I imagine using Copy/Paste, but I just don’t get it yet, can anyone please help me with this last little piece? Thank you!
Hi Sam,
Apologies for such a late reply to your query. Your comment for some reason got buried under a huge load of spam. To answer your question, I don’t think we can automatically insert a time stamp every 10 seconds, at least not with Express Scribe. If you can assign a convenient key to copy the time stamp, and then be really fast with Ctrl + V, maybe that helps.
I am currently using Express Scribe for audio files and manually transcribing the files. I just started using the Speech To Text feature but it is horribly inaccurate. How do I train it to be more accurate? Can I or do I need another program?? I am not the one dictating so they are audio files, is this even possible? Any help or guidance would be much appreciated!
Hi Hank,
Thanks for your comment. Unfortunately a lot of speech to text software is horribly inaccurate, unless you speak super slowly to it like you would to a baby, be really close to the microphone, and have absolutely no background noise.
So, single speaker audio works best. I don’t think any speech to text software does a good job on a normal interview with 2 or more people.
Also, I’m not sure you can train Express Scribe. You can train other software like Dragon NaturallySpeaking, but it’s expensive (about $400).
You can try our automatic transcription at $0.10 per minute. Just upload a sample file on our transcription services page and we’ll let you know if you’ll get any sort of accurate speech to text transcription for your audio file.